How to Stop AC from Leaking Water?
To stop your AC from leaking water, identify the root cause first, a clogged condensate drain line is responsible for over 75% of all AC water leaks. Other causes include a dirty air filter, frozen evaporator coil, cracked drain pan, or low refrigerant. Most leaks can be fixed in under an hour with a wet/dry vacuum, distilled vinegar, and basic hand tools.
Here is a quick overview of different methods to stop AC leaking water.
| Task | Method | Frequency | Time Needed |
|---|---|---|---|
| Clear condensate drain line | Wet/dry vacuum + vinegar flush | Monthly | 15 minutes |
| Replace air filter | Swap with MERV 8–13 filter | Every 1–3 months | 5 minutes |
| Inspect drain pan | Visual check + crack sealant | Every 6 months | 10 minutes |
| Thaw frozen evaporator coil | Fan-only mode | As needed | 2–4 hours |
| Check condensate pump | Test float switch + discharge line | Every 6 months | 15 minutes |
| Professional coil inspection | HVAC technician | Annually | 30–60 minutes |
Why Your AC Is Leaking Water?
Air conditioners remove humidity from indoor air through a process called condensation. As warm air passes over the cold evaporator coil, moisture collects on the coil and drips into a drain pan below it. That water then flows through the condensate drain line and out of the building. When any part of this system fails, water backs up and leaks into your home.
Understanding the exact cause prevents repeat leaks and unnecessary repair costs.
1. Clogged Condensate Drain Line
A clogged condensate drain line is the single most common cause of an AC leaking water, accounting for more than 75% of reported cases. Over time, algae, mold, dust, and debris accumulate inside the 3/4-inch PVC drain pipe, blocking the flow of condensate water. The water then backs up into the drain pan and overflows into the ceiling, wall, or floor.
Signs of a clogged drain line:
- Water pooling around the indoor air handler
- Musty or mildew smell from vents
- AC shuts off automatically (float switch triggered)
- Visible water stains on ceilings or walls near the unit
How to unclog the drain line: Locate the condensate drain line, it is typically a white PVC pipe exiting the air handler. Connect a wet/dry vacuum to the outdoor end of the drain line and run it for 1–2 minutes to pull out the clog. Alternatively, use a hand pump drain clog remover tool rated for 3/4-inch pipes. After clearing the clog, flush the line with 250ml of distilled white vinegar to kill algae and prevent regrowth.
2. Clogged Air Filter
A clogged air filter blocks airflow over the evaporator coil. Reduced airflow causes the coil temperature to drop below 32°F (0°C), freezing the condensate on its surface. When the unit cycles off and the ice melts, large volumes of water overflow the drain pan faster than the drain line can handle, causing a visible leak.
Air filter replacement schedule:
- Standard 1-inch filters: every 30–60 days
- 4-inch media filters: every 6–12 months
- HEPA filters: every 12 months
Replace the air filter with an exact-size replacement in the same MERV rating (MERV 8 for standard homes, MERV 11–13 for homes with pets or allergies). Never run the AC without a filter installed, as unfiltered air deposits debris directly onto the evaporator coil.
3. Frozen Evaporator Coil
The evaporator coil freezes when airflow is restricted, refrigerant is low, or the outdoor temperature drops below 60°F (15°C) during operation. A frozen coil holds water as ice. When the ice melts either when the unit cycles off or when the thermostat setpoint is reached, it produces more water than the drain pan and drain line can handle simultaneously.
How to thaw a frozen evaporator coil:
- Turn the thermostat to OFF or switch the system to fan-only mode.
- Leave the fan running for 2–4 hours to circulate warm air over the coil.
- Place towels around the air handler to absorb overflow water.
- Once thawed, check the air filter and replace it if dirty.
- Restart the AC and monitor for refreezing within the next 30 minutes.
If the coil refreezes after replacement of the air filter, the refrigerant charge is likely low and requires a licensed HVAC technician to inspect and recharge.
4. Cracked or Overflowing Drain Pan
The primary drain pan sits directly under the evaporator coil. Most residential AC units also have a secondary (overflow) drain pan beneath the air handler as a backup. Drain pans are made from galvanized steel or plastic and develop cracks or rust over 10–15 years of use.
How to inspect the drain pan:
- Remove the access panel on the air handler.
- Inspect the primary pan for standing water, rust, or visible cracks.
- Dry the pan with a shop towel and look for water reappearing from a specific point (indicates a crack location).
How to repair a cracked drain pan: Apply waterproof HVAC drain pan sealant or two-part epoxy putty (such as Rectorseal Pan Seal or JB Weld WaterWeld) to clean, dry cracks. Allow 24 hours of cure time before restoring water flow. Pans with extensive rust or multiple cracks require full replacement.
5. Blocked Condensate Pump
Buildings where the air handler is installed in a basement or interior closet without gravity drainage use a condensate pump to push water upward and out of the building. A failed condensate pump allows water to accumulate in the pan until it overflows.
Signs of a failed condensate pump:
- The reservoir (clear plastic tank) is full of standing water
- The pump runs but water level does not drop
- The pump does not activate when the float switch rises
How to test a condensate pump: Disconnect the unit and pour water slowly into the reservoir until the float switch activates. A functioning pump starts within 5 seconds and empties the reservoir in under 2 minutes. Replace the pump if it fails to activate or fails to clear the water.
6. Low Refrigerant (Refrigerant Leak)
Low refrigerant reduces the pressure inside the evaporator coil, causing the coil surface temperature to drop abnormally low and freeze. This produces the same overflow effect as a frozen coil caused by airflow restriction. A refrigerant leak is confirmed by a hissing sound near the outdoor unit, ice on the refrigerant lines, or an AC that cools poorly despite running continuously.
Important: Refrigerant handling requires EPA Section 608 certification. Never attempt to add refrigerant yourself. A licensed HVAC technician uses manifold gauges to measure refrigerant pressure, locates the leak using nitrogen pressure testing or electronic leak detectors, repairs the leak, and recharges the system with the correct refrigerant type (R-410A for systems after 2010, R-22 for older systems).
7. Improper AC Installation
An air handler installed at the wrong angle causes condensate water to pool on one side of the drain pan instead of flowing toward the drain outlet. Most residential air handlers require a slight forward tilt (toward the drain outlet) of 1/4 inch per foot. An improperly leveled unit is common in newly installed systems or after a unit has been moved.
How to check: Use a standard bubble level on top of the air handler. Adjust the mounting brackets or support legs until the unit is level or very slightly tilted toward the drain outlet. Shims cut from PVC or rubber are standard tools for this adjustment.
How to Stop AC from Leaking Water?
This complete process takes 30–90 minutes and covers the most common causes in the correct diagnostic order.
1. Turn the AC Off Immediately
Water damage from a leaking AC accumulates within hours. Switch the thermostat to OFF mode (not just the fan). If the leak is active and water is dripping on electrical components, switch off the breaker for the AC system at the main panel.
2. Locate and Absorb Standing Water
Use dry towels or a wet/dry vacuum to absorb any standing water around or beneath the air handler. Check for water in ceiling tiles, inside wall cavities, and on the floor below the unit. Water left standing for more than 24 hours causes mold growth and structural damage.
3. Check and Replace the Air Filter
Pull the existing air filter and inspect it. A gray, matted, or visibly clogged filter is the easiest fix and takes 5 minutes. Install an exact-replacement filter with the same dimensions and MERV rating. Note the installation date on the filter frame with a marker for future reference.
4. Clear the Condensate Drain Line
Locate the condensate drain line access port (a T-shaped PVC fitting with a cap, typically located on the drain line within 6 inches of the air handler). Remove the cap and pour 250ml of distilled white vinegar into the port. Allow 30 minutes for the vinegar to break down algae and debris. Then use a wet/dry vacuum on the outdoor end of the drain line for 90 seconds to pull the loosened clog out completely.
5. Inspect the Drain Pan
With the AC still off, open the air handler access panel and visually inspect the primary drain pan. Remove standing water using a turkey baster or wet/dry vacuum. Look for rust stains, standing water with no visible crack (indicates a drain line clog was the only issue), or visible cracks. Seal any cracks with HVAC pan sealant and allow the sealant to cure per manufacturer instructions.
6. Check the Float Switch
The float switch is a small safety device installed in the drain pan or on the drain line. When water rises above a set level, the float switch cuts power to the AC compressor to prevent overflow damage. If the float switch is triggered, it prevents the AC from cooling even after you clear the clog. Once the drain pan is empty and the drain line is clear, the float switch resets automatically as the water level drops.
7. Restart and Monitor
Restore power and set the thermostat to “Cool” mode at its normal setpoint. Monitor the drain pan and the area around the air handler for the next 30 minutes. Run your hand along the condensate drain line to feel for cold spots or bulging (signs of remaining blockage). A properly functioning system produces a steady, small flow of water from the outdoor drain line termination point within 10–15 minutes of starting in humid conditions.
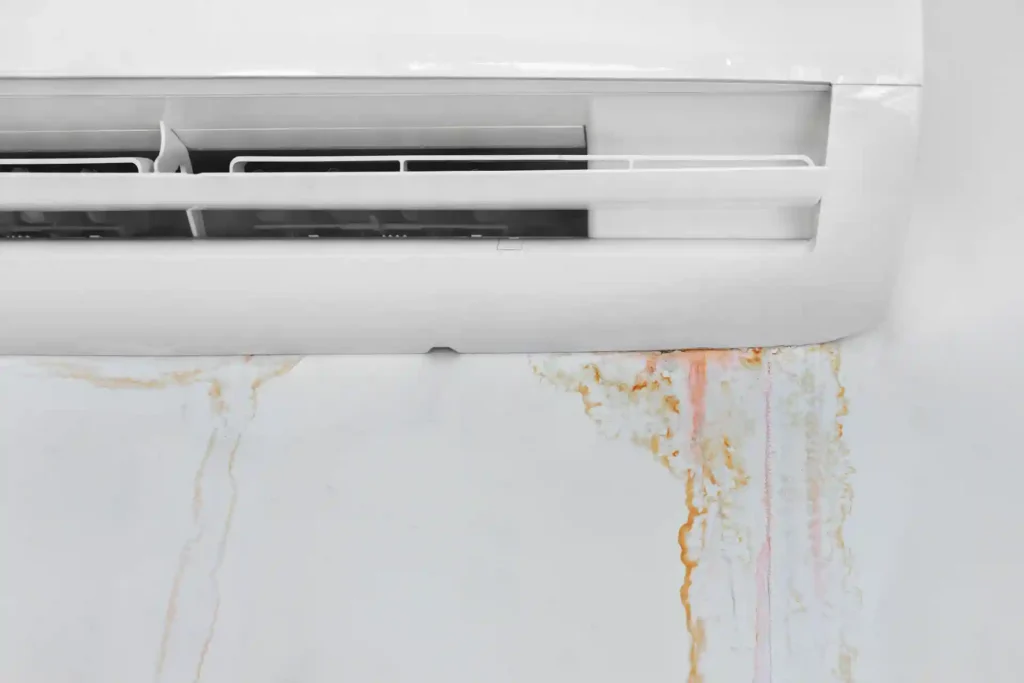
Common AC Water Leak Locations and What They Mean
| Leak Location | Most Likely Cause | Urgency |
|---|---|---|
| Directly under indoor air handler | Clogged drain line or overflowing pan | High, fix same day |
| Ceiling below the air handler | Overflowed drain pan + slow leak | High, check for structural damage |
| Around outdoor condenser unit | Normal condensation (not a leak) | None, normal operation |
| Along refrigerant lines (copper pipes) | Frozen coil melting | Medium, check filter and refrigerant |
| Water dripping from vents | Frozen coil or humidity imbalance | Medium, thaw coil and check airflow |
When to Call a Professional
Contact a licensed HVAC technician when:
- The evaporator coil refreezes within 30 minutes of thawing (indicates refrigerant leak)
- The refrigerant lines are iced over from the indoor unit to the outdoor unit
- The drain pan has extensive rust or structural damage
- Water leakage has caused ceiling or wall damage (requires remediation assessment)
- The AC trips its breaker every time it runs
- The condensate pump fails after replacement of the pump unit itself (indicates wiring fault)
Conclusion
Stopping your AC from leaking water starts with one action: clear the condensate drain line. It is the cause in 3 out of 4 cases and takes under 15 minutes with a wet/dry vacuum and white vinegar. For persistent leaks, frozen coils, or suspected refrigerant issues, contact a professional. Our AC service company in Dubai provides same-day leak diagnosis and repair for all major residential and commercial AC brands including Daikin, Trane, Carrier, and Gree.
Frequently Asked Questions
Q: What is the best product to prevent AC drain line clogs?
The best product to prevent AC drain line clogs is distilled white vinegar, used as a monthly 250ml flush. For more aggressive prevention, HVAC-specific algae tablets such as Rectorseal Mighty Might or Nu-Calgon Drain Pan Tablets dissolve slowly in the drain pan, releasing biocide that kills algae and mold for up to 3 months per tablet. Both products cost under $15 and are available at hardware stores and HVAC supply outlets.
Q: What is the most common challenge when trying to stop an AC water leak?
The most common challenge when trying to stop an AC water leak is finding the exact location of the clog or damage. Condensate drain lines can be up to 20 feet long and routed through walls or attics, making a partial clog hard to locate. Using a wet/dry vacuum at the outdoor termination point pulls out debris regardless of clog location, making it the most reliable first step even when the clog is not visible.
Q: What should I do first when I see water leaking from my AC?
The first thing to do when you see water leaking from an AC is to turn the system off immediately using the thermostat. Continued operation with a blocked drain line forces water into areas that cause mold growth and structural damage within 24–48 hours. After turning off the unit, absorb standing water with towels or a wet/dry vacuum, then begin diagnosis starting with the air filter and condensate drain line.


